 Home
Home

 What's New

 User Manual


 1. Introduction


 2. Basic Uploads


 3. Config Params


 4. Advanced


 5. International


 6. File Downloads

 Chapter 1: Introduction & Quick Start
1.1 What is XUpload?
1.2 XUpload Feature Summary
1.3 System Requirements
1.4 Getting Started
1.5 Version Management
1.6 Installation & Expiration Mechanism
1.7 Click-to-Activate Workaround
XUpload is an advanced client-side ActiveX control to be used in a Microsoft Internet Explorer (IE) environment to perform file uploads from a user machine to the web server.In a pure-HTML solution, client files can be uploaded to the server via a multipart/form-data form with one or more <INPUT TYPE=FILE> items on it. However, the form-based approach has the following limitation:
- The "Choose File" dialog shown by a browser does not allow multiple selections.
- To upload multiple files at once, the HTML form must contain multiple <INPUT TYPE=FILE> boxes, and each file must be selected individually.
- An entire folder cannot be selected for uploading.
- Default values for the file names cannot be pre-set (browsers do not allow it for security reasons).
- There is no way to set a default directory for the Choose File dialog box.
- There is no way to specify file filters to be displayed in the Files of Type box of the "Choose File" dialog.
- There is no way to put a limit on the type, size and number of files being uploaded before an upload begins.
- File date information cannot be preserved.
Using XUpload instead of an HTML form helps overcome these and many other limitations of traditional form-based uploads.
While XUpload is primarily intended to be used on web pages viewed by Microsoft IE, it can also be used in custom applications written in VB or any other language supporting COM.
Being a Windows ActiveX control, XUpload cannot be used in browsers other than IE, or platforms other than Windows. XUpload will not work on a MAC or in Netscape/Firefox/Opera.
1.2 XUpload Feature Summary
XUpload can be used on all Windows platforms including:Windows NT
Windows XP
Windows 2000
Windows 2003
Windows 2008
Windows Vista
Windows 2012
Windows 2016
In a Web environment, XUpload can only work in Internet Explorer 4.0+. Other browsers are not supported (including Microsoft Edge).
To place XUpload on an HTML page, an <OBJECT> tag should be used with the CLASSID attribute set to XUpload's unique class ID. You must also specify a path to the location of the xupload.ocx file relative to the current HTML page (and optionally its current version) via the CODEBASE attribute. Other useful attributes are ID to identify the control in client-side VB or Java script, and WIDTH and HEIGHT to specify the control's size on the page.XUpload is configured to do useful work via a set of required and optional <PARAM> tags which are placed between the opening and closing <OBJECT> tags. The two required parameters are Server and Script which together specify the location of a server-side upload script which captures the uploaded files. In all code samples of this user manual, the Server parameter is set to localhost. In a real-life application, that has to be replaced by an actual server address, such www.server.com. An IP address can also be used.
HTML:
<OBJECT WIDTH=500 HEIGHT=200
ID="UploadCtl"
CLASSID="CLSID:E87F6C8E-16C0-11D3-BEF7-009027438003"
CODEBASE="XUpload.ocx"><param name="server" value="localhost">
<param name="script" value="/xupload/01_simple_upload.aspx"></OBJECT>
An upload script usually captures the uploaded files and places them in a folder or database on the server. In classic ASP, a server-side upload component such as AspUpload is required. ASP.NET provides its own built-in upload functionality via the HttpPostedFile object.
The following code samples are simple upload scripts written for the ASP and ASP.NET environments. To run the former, you must also have AspUpload installed on the server. Both code samples place the uploaded files in the c:\upload directory on the machine they are running on, so make sure this directory exists before running the samples or change the scripts to point to some other, existing directory.
Server-Side VBScript:
Set Upload = Server.CreateObject("Persits.Upload")
Upload.IgnoreNoPost = TrueCount = Upload.Save( "c:\upload" )
Response.Write Count & " files(s) uploaded:" & chr(13) & chr(10) & chr(13) & chr(10)
For Each File in Upload.Files
Response.Write File.Path & chr(13) & chr(10)
NextC#:
<%@ import Namespace="System.IO" %> <script runat="server" language="C#">
void Page_Load( Object sender, EventArgs e)
{
if( Request.ContentType.IndexOf( "multipart/form-data" ) < 0 )
return;string strUploadPath = "c:\\upload";
Response.Write( Request.Files.Count.ToString() + " file(s) have been uploaded:\r\n\r\n" );
for( int i = 0; i < Request.Files.Count; i++ )
{
HttpPostedFile objFile = Request.Files[i];
String strPath = strUploadPath + "\\" + Path.GetFileName( objFile.FileName );
objFile.SaveAs( strPath );Response.Write( strPath + "\r\n" );
}
}</script>
Click the links below to run this code sample:
http://localhost/xupload/01_simple.asp
http://localhost/xupload/01_simple.aspx

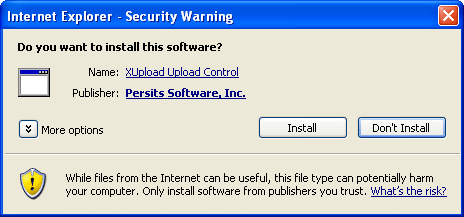
Unless the XUpload control was previously installed on your machine, you should see a dialog box similar to this one:

The file XUpload.ocx is digitally signed to provide proof to the user that the control he is about to install on his machine really came from Persits Software, Inc., and that it was not tempered with during transmission. Click "Yes" to have the browser install the control on your computer.
You should now be able to see the control inside your browser. It looks like a standard Windows list view control with two columns, Files and Size. Right-click anywhere inside the control. A pop-up menu appears with four menu items, "Select Files", "Select Folder", "Remove All" and "Upload".
The Remove All and Upload items are grayed out as there are no files selected. Choose Select Files to invoke the standard "Select Files" dialog box. Choose a few files and click Ok. The selected files appear in XUpload's list control with their respective icons and size information. You can now remove any or all files from the list by highlighting the appropriate items, right-clicking inside the control and choosing Remove or Remove All. We can also sort the items alphabetically or by size by clicking on the Files or Size headers, respectively.
Now select "Upload" from the pop-up window. A progress dialog box appears. Once the upload is complete, a message box titled "Reply from the Server" pops up:

The text inside the message box came directly from the server and was generated by our upload script. Alternatively, XUpload can redirect the browser to another page upon the completion of an upload, as described in Chapter 2.
The IE browser keeps cached copies of all ActiveX controls it has downloaded and installed in the past. This way it does not have to re-download and reinstall a control every time a page hosting this control is viewed by the user.However, if a new version of the control OCX file is placed on the server, if is necessary to force IE to download and reinstall this new version. This is achieved by appending a #VERSION=... keyword to the name of the ocx file in the CODEBASE attribute, as follows:
<OBJECT WIDTH=500 HEIGHT=200
ID="UploadCtl"
CLASSID="CLSID:E87F6C8E-16C0-11D3-BEF7-009027438003"
CODEBASE="XUpload.ocx#VERSION=3,2,0,2">
...
</OBJECT>The browser examines the #VERSION portion of the CODEBASE attribute and if the currently installed version of XUpload is lower that the one specified by #VERSION, a new version will be downloaded from the server and installed over the old version.
You should update the #VERSION keyword of all your XUpload-hosting HTML files every time you place a new version of the xupload.ocx file on the server. The current version can be obtained by viewing the properties of xupload.ocx in Windows Explorer. It can also be obtained via the UploadCtl.Version property which returns it in the following format: "3.2.0.2". Dots must be replaced by commas.
1.6 Installation & Expiration Mechanism
Generally, XUpload does not need to be registered on the server using regsvr32 (unless you want to use it as a server component which is described in Chapter 4). But the control library file xupload.ocx does need to be placed on the server in a virtual directory from where a client browser can download it.The simplest way to install xupload is to place xupload.ocx in the same directory as the HTML files that reference it. Under this scenario, you just need to set the CODEBASE attribute of the <OBJECT> tag to the string "xupload.ocx". If you choose to place xupload.ocx in a common shared virtual directory where multiple HTML files of your site can access it, you need to set the CODEBASE attribute to the virtual path to the ocx file, e.g. CODEBASE="/shared/xupload.ocx".
XUpload 3.0 has a key-based expiration mechanism. The evaluation version downloadable from xupload.aspupload.com is fully functional and the evaluation period is indefinitely long. However, it occasionally displays a "nag" message reminding the user to purchase a registration key.
Once the registration key is purchased, it needs to be included as a <PARAM NAME="RegKey"> in all the source HTML files using XUpload, as follows:
<OBJECT WIDTH=500 HEIGHT=200
ID="UploadCtl"
CLASSID="CLSID:E87F6C8E-16C0-11D3-BEF7-009027438003"
CODEBASE="XUpload.ocx">...
<param name="RegKey" value="BrxCnX4zjzkh4...ZKMndJBcawbRwA+jq">
...
</OBJECT>If XUpload is called from a Windows application or used as a server component, the key should be specified via the RegKey property, as follows:
UploadCtl.RegKey = "BrxCnX4zjzkh4...ZKMndJBcawbRwA+jq"
1.7 Click-to-Activate Workaround
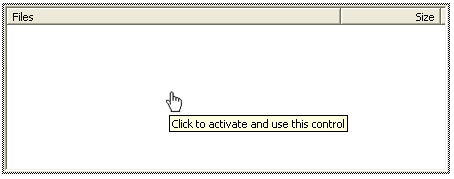
As a result of a lost lawsuit, Microsoft has made changes to IE, and now it requires that the user click on an ActiveX control to activate it:

At the same time, Microsoft made public a number of simple workarounds that disable this annoying new "feature." Here is one of them:
Below your last <OBJECT> tag, insert the following JavaScript line which calls ie_workaround.js:
<script type="text/javascript" src="ie_workaround.js"></script>
Put the following code in the file ie_workaround.js:
objects = document.getElementsByTagName("object");
for (var i = 0; i < objects.length; i++)
{
objects[i].outerHTML = objects[i].outerHTML;
}
More methods are described here.
NOTE: This method cannot be used if the XUpload or XDownload controls need to be pre-populated as described in Sections 3.3 and 6.1.

Copyright © 1998 - 2010 Persits Software, Inc.
All Rights Reserved.
XUpload™ is a trademark of Persits Software, Inc.